Getting Started with React & TypeScript
Alright, it's time to code React! This is best done by following along, asking questions, and writing code. Please feel free to reach out to me with any questions you have.
This section will get the project created and walk through what each of the files is and does. I'll trim down the boilerplate code to something simple so each line of code is understandable. You will know exactly what every line of code in your project does.
Let's dive in!
Install Node
The first requirement is to have a modern version of Node.js installed. Node.js is a JavaScript runtime that allows you to run JavaScript code on your computer. The code you write is not the same code that the browser executes. React adds some magic that web browsers cannot understand. Instead, the code is compiled to JavaScript which can be interpreted by the browser. This is common for advanced web apps.
Fire up your terminal.
macOS
I suggest you use HomeBrew:
Windows
Install from the website, and then open Powershell to verify.
https://nodejs.org/en/download/
Ubuntu
Post Install
After you install Node.js, you can then run:
And have something after 14.x be the result. 16.x. is the latest LTS
version.
Setting up the app
Learning React is best done by building a web app to exercise the concepts you are learning. Academic learning doesn't build muscle memory like writing code does.
I encourage you to make something else as well to exercise the things you have learned. You'll find new problems and issues that aren't covered here. Those are great questions to come ask!
This guide is going to start basic and layer in more complex topics. I want to guide you in building something, but also understanding what you are making.
The app you are making will follow the same pattern, starting basic and growing in complexity.
To that end, this guide is going to focus on making a to-do app.
Running the commands
Now that Node.js is installed, it's time to set up your first React app. This is
best done with create-react-app. This command will create the basic structure
of your project and set up the build system. create-react-app has different
templates and this guide will use the typescript one. Again, TypeScript is
awesome.
This setup is not just for basic quick apps. It is meant to take you to a
production website. If you ever outgrow the scaffolding in create-react-app
you can run a command to get access to all the underlying configurations
(eject).
To start, run:
Let's unpack that a little
This jumpstarts your entire project! There is a lot of code to explore, especially if this is your first React app.
Let's check out what this has made!
I'll dive in deeper in a bit, but the basic file structure is:
publicserves all files in it as is, outside of the React runtime.srcis for all files that are compiled into your final React app.tsconfig.jsonis the TypeScript configuration.yarn.lockorpackage.lockis the lock file for your dependencies.
Start it up!
Let's make sure it works before you go on and break everything:
This will start the development server, compile the react app, and open a tab in
your preferred browser on port 3000. You should see your app up and running!
Congrats!
This comes with live reloading, so you can go into a file, change it, and see the changes.
Demystifying the magic
Create-React-App is an incredible tool to get you started quickly. It brings a certain level of magic though. The downside to this is if you don't set everything up from scratch, then it's harder to understand what is going on under the covers. When things break, it's harder to debug. The benefit is you have an app up and running in one command.
I'm a big fan of understanding what's going on as much as is reasonable. You don't need to create a build system, but understanding what's happening in this one will help a lot.
Let's go!
The files
There are four files on the top level that are all important.
package-lock.json
Or yarn.lock. This keeps the dependencies from changing between installs.
package.json
This defines the dependencies in the project. These are all, incorrectly, listed
in the dependencies key. Most of them should be in devDependencies instead.
You can safely change them to this (version numbers might be slightly different):
If you changed it, run:
Both the commands npm start and npm build will continue to work as expected.
Why does this matter? As the number of dependencies increases, it's important to
keep them separate. This will help you and your team to organize your project.
It can be used at different stages of CI to only install certain dependencies.
You should also remove the ^ in front of the version numbers. This symbol
informs the package
manager
which versions of the dependency are okay to install. The ^ means anything
that is “compatible” with this version. What does compatible mean? It's pretty
ambiguous. At the end of the day, it's safer to pin your dependencies to an
exact version. That's what just having the version number does.
As for the dependencies, React requires react and react-dom. The project
scaffolding requires react-scripts, which run the scripts listed in the
package.json file.
For the dev dependencies, they are either testing dependencies or used by TypeScript.
README.md
The project readme, which offers good instructions. Feel free to replace the content with details about your process and app.
tsconfig.json
This is the configuration file for TypeScript. You can read about the various options here: https://www.typescriptlang.org/tsconfig. For now, the defaults will suffice.
The most important thing to note is that this configuration only looks at the
files in src directory. You can't put files outside of that directory and have
them work.
Moving into the directories
Next up are the directories and their contents.
/public
favicon.icois the favicon.logo192.pngandlogo512.pngare static images used in the app.manifest.jsonis for a progressive web app and can change attributes when a shortcut is installed on a device. You can read more here.robots.txtis for bots to scrape or not scrape the website.
There is one file I want to dive into:
index.html
This is mostly normal markup, but there are two things you should note. If this is your first look at HTML, (HyperText Markup Language), it is the language of defining content on the web. The first thing to note is:
This uses a special string, %PUBLIC_URL%, that is swapped out at build time
the path to the public path on the server. Most of the time, this is /, the
root path. If you host your web app on a different path it can be updated to use
that.
This file sets lots of sane defaults, but most of it is also completely unnecessary. I think it's important to understand what's required here. And what's technically required, to have the app work... is a single line of code. Please delete the entire file and replace it with:
(For the sharp eyes, this is on line 31 of the file).
Save the file. Stop and restart the development server.
It should look exactly the same. If you want to add back some of the code you
removed you can do so. If you don't know what any of it means, you can look it
up as you add it back! A basic index.html with the important parts looks like:
src
This is React! All the files ending in tsx are React files. Before jumping
into those, take a look at the other files.
App.test.tsx
This file contains the tests for the App.tsx file. This uses the fantastic
@testing-library/react
library to test React.
How this works is:
- Jest runs the test, which is defined by
test(). - The
rendercall will render the component like a browser will but without the browser! - Then, ask the
screenobject (which has the rendered result), to get the element with the text. - Run a test assertion, expecting the element to be in the document.
You can do more intricate things with tests, but I'll get to that in a later chapter. Tests are critical for creating a production-quality app, and React testing is some of the best.
setupTests.ts
This file sets up the tests for Jest.
reportWebVitals.ts
This file sets up reporting web vitals. You can read more about web vitals here.
react-app-env.d.ts
This file is needed for the scripts to run. It has the type definitions for the types.
App.tsx
Ah yes, React. This file contains the React code you are going to work with. You're going to build this up, but first, you need to remove the generic starting template. This will get down to basics and make sure you understand everything you are writing.
Clear out the file for the following:
functiondefines a JavaScript function, with the nameApp.- This function takes no parameters, so
()is the function signature. It then has the contents of the function inside the{ }brackets. - It
returns the expression, so the caller can use it. - That expression is a JSX element, which you will see in more detail in the next chapter. That element is later rendered by the browser and it shows up!
- Lastly, mark this as
exportso the expression exported can be used in another file. - It's a
defaultexport, which means it is imported with the syntax:import NameHere from './file'.
And that's the file! You can trim it down some more with ES 6 syntax:
This is as small and simple as it can get. It exports a default function that
has no name. That function is a component, and it returns the JSX element of
<>Hello World</>.
A React component needs to return JSX element, it can't return just a regular
string. This is why you can't return the literal 'Hello World. You need to
wrap it with the <> ... </>.
When you trim this down, it will look like this:
(Not very exciting yet. But simple!)
Moving on.
index.tsx
This file contains the root of your application. It is what starts React.
It is the entry point, where React renders your application inside a Strict Mode boundary. Strict mode is a development aid and doesn't render anything in the browser. You can read more on the official docs.
By removing the unnecessary code, you can trim this down to:
This is the only code needed, including imports. Remember the index.html
edited earlier? It was trimmed down entirely to just have id="root" . The
root word wasn't important. It can be any word. This JavaScript code executes
and finds the specified browser DOM element. It uses that element as the root
of the React app. Almost all the time, you want it to be at the root of your
project.
Purge if you want
At this point, you can delete a lot of these files and slim down the project. If this helps focus you and remove clutter, you can remove:
App.cssApp.test.tsxindex.csslogo.svgreportWebVitals.tssetupTests.ts
The index.tsx and App.tsx files should be updated to not import the above
files if you delete them.
Into the DOM
Lastly, let's do some inspection of what the browser sees. To properly do this, you will need to install the React Dev tools:
Once installed the dev tools give you the ability to see exactly what your browser is rendering at the React level, which is very powerful. To open the dev tools right-click anywhere on the webpage and click “Inspect”.
The elements/inspector tab should look like:
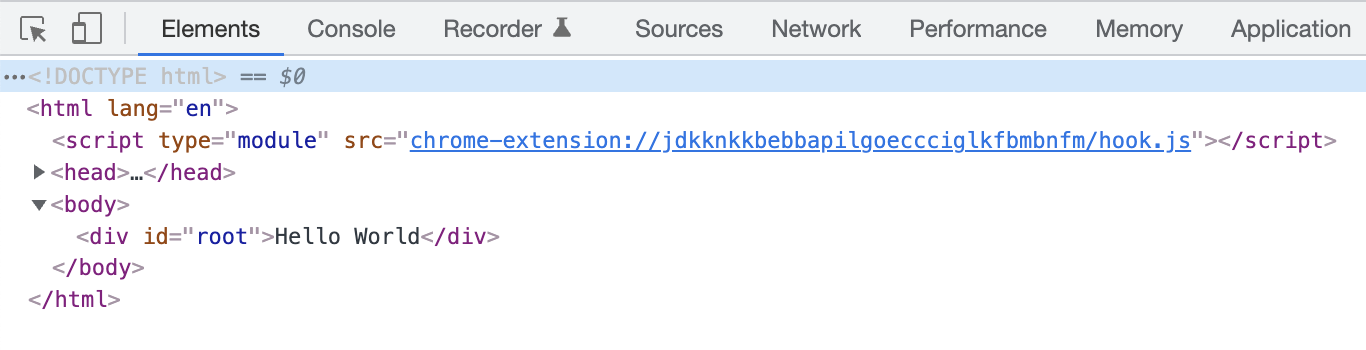
You know where every single element came from! The <html> and <body> are
defined in our index.html file. Even if you remove them, the browser will
ensure they are present. The <div id="root"> is also in the HTML file, that's
the root of our React App. Everything inside that div is React, and it says...
“Hello World”. That's the super simple App component we created earlier.
To get started with the React developer tools switch to the "⚛️ Components" or "⚛️ Profiler" tab. You may need to restart the browser if you just installed them.
Jump to the Components tab.
If you don't see anything here, go back to your index.tsx file. Add back in
the <React.StrictMode>, around the <App />. StrictMode helps with debugging!
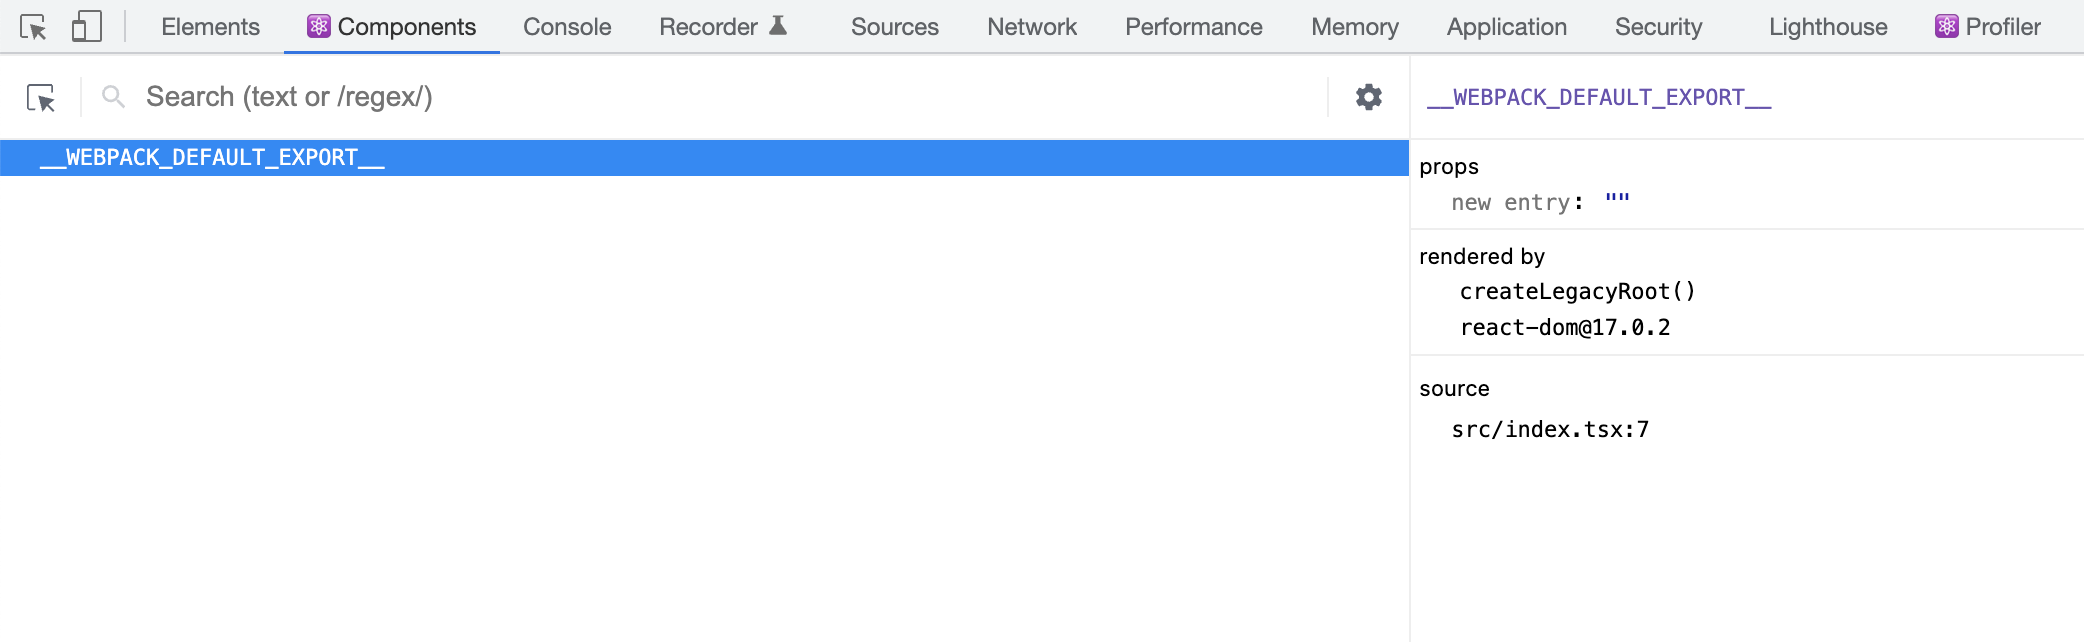
Remember above how I said the no-named export above is not good code? This is why. Because it does not have a name, no name shows up in the React Dev tools. This makes debugging harder. When Debugging is harder then programming takes longer.
Go back to App.tsx and change the content to:
Now the React dev tools should show:
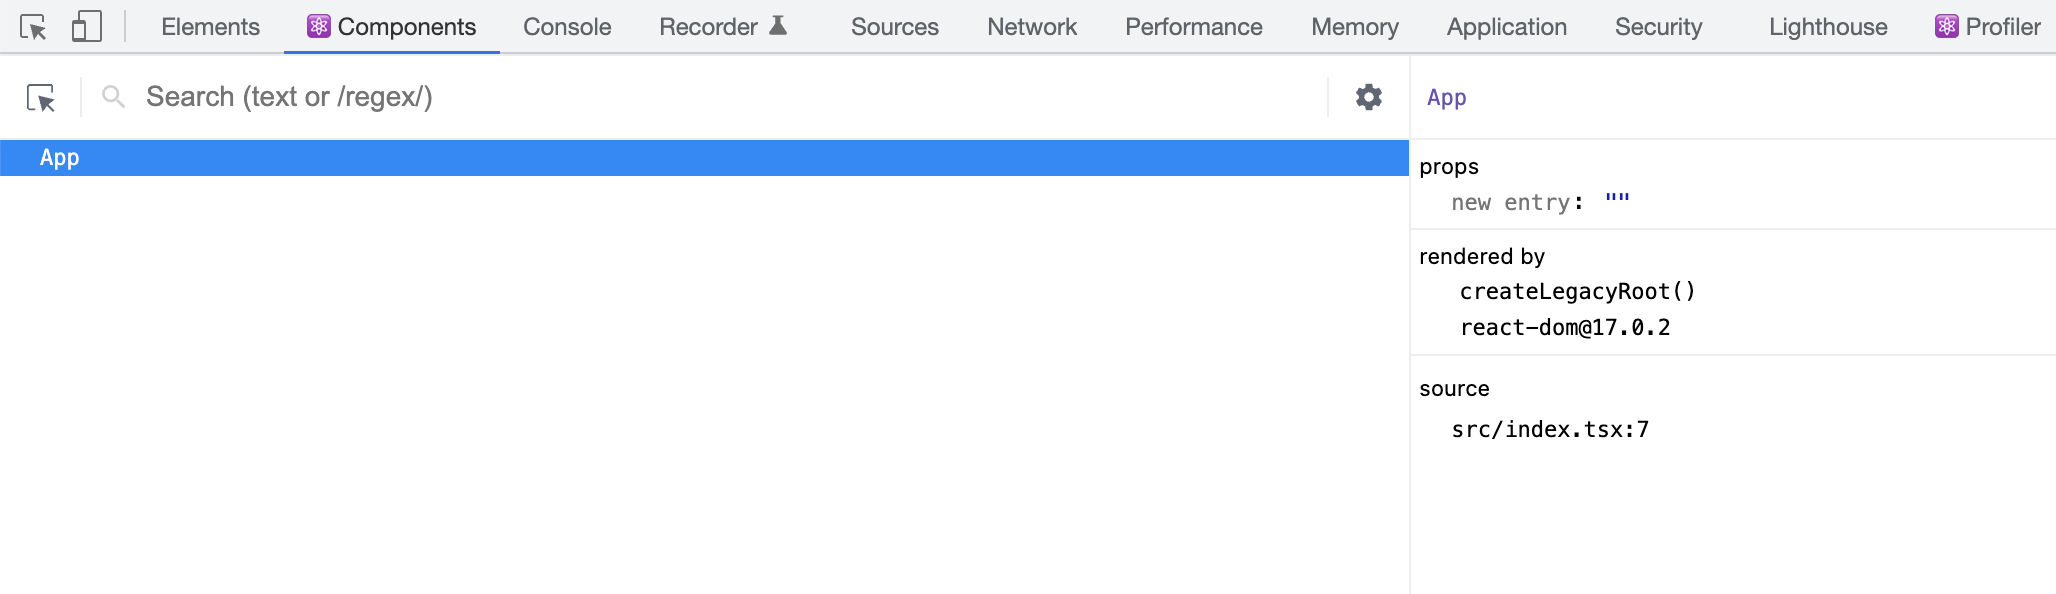
Your component has a name! Much nicer.
React only sees the App, because that is the only component it is rendering.
Remember, React doesn't see the html, body, and div tags in the
index.html since they are outside the root. All React knows about is the one
component it's rendering. That will turn into a lot more soon.
The React programmer lifecycle
To get from the code to what the browser renders, you:
- Write your code in TypeScript
- It gets compiled into JavaScript. If there are errors you can catch them here!
- React loads and executes that JavaScript. React does powerful things before the browser sees the final output.
- React then passes the final output to the browser, which renders and displays it.
React renders only when it needs to, which can be once, or many times per second.
And now you're writing in React.
Optionally, set up Prettier
Install Prettier for your editor: https://prettier.io/
Code consistency is important. It helps with code merges. It keeps you focused on writing code, and not paying attention to what the code looks like. You can tweak the settings to your preferred style, but I stay pretty close to the defaults.
Except for semicolons. Those can go.
My .prettierrc.json file:
From code to DOM
You are now at the point where you can start hacking on your React project! You
can write your code in the src folder. You know what each file is and what
every line of code does. With hot reloading, you can edit the code, save it, and
it will show up in the browser instantly. Lastly, you can inspect the browser
DOM to see exactly what the browser sees. You can also use the React Developer
tools to see what React sees. This is often the layer you will be debugging.
Where to now? More code! Let's build a fantastic To-Do app!
See the final result of this project on GitHub: https://github.com/ethanmick/react-01